By Charity Shumway |

How to Grow Eggplants

(image)

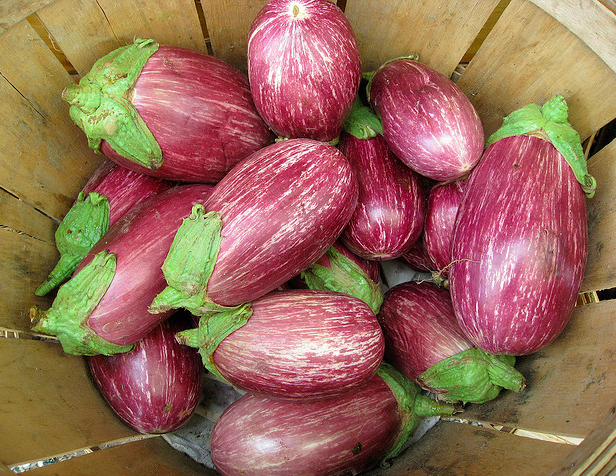
Think of eggplant recipes, and many of the flavors you immediately conjure up are Middle Eastern — the musk of cumin or the silky punch of tahini mixed with melt-in-your-mouth roasted eggplant. There’s a reason for that. Eggplants need a long, warm growing season. They thrived in India and Arabia long before anyone thought to try them in more northern climates. Fortunately, a garden in Damascus is not a requirement for eggplant cultivation, but a little extra care to give your eggplants the warmth they need will go a long way toward a successful harvest.

A few keep-’em-warm tips:

  • Start your eggplants early, indoors, and move your containers outside only when all danger of frost is past.
  • Find a microclimate. Do you have a wind-protected corner that gets lots of sunshine? A spot against a white wall that heats up during the day? Pick your warmest, coziest spot and tuck your eggplant pot right into it.
  • Grow them indoors. The smaller varieties of eggplants (which happen to be some of the most beguiling) can thrive in a sunny window.

Click through for the rest of the primer on growing this oh-so elegant vegetable.  (more…)

By Nadia Arumugam |

‘Tis The Season For Apples, And We’re Baking…Again

Every now and then when I’m tinkering in the kitchen, all the stars in the culinary constellation align just right. That’s what happened when I baked this French apple tart at a photo shoot (the talented photographer, by the way, was Dan Jones). Admittedly, I had spent close to the best part of an afternoon painstakingly arranging apple slices in a perfect concentric design. No matter. They still could have shifted in the oven, or puffed up disruptively or worse still, burned. But they didn’t. Instead they behaved and stayed put, and like real troopers took on a beautifully autumnal golden hue with wispy, burnished edges.

As for the crust, sure it looks perfectly browned, but what you can’t see is that it was also meltingly tender, buttery, crumbly and crisp all at the same time. And look more closely. Spy that luscious, almost custardy almond frangipane sitting beneath the sheet of sliced apple? This really was a tart to trump all other tarts, and that’s why I propose you shake up the Thanksgiving spread. Leave the can of pumpkin in the cupboard and grab the apples instead.

Peak season for many apple varieties is September to November. But if you buy your apples at the grocery store or supermarket, you don’t really need to worry about making sure you get them immediately after they’re harvested. Freshly picked apples have a natural waxy coating that protects them from losing water and shriveling. Federal regulations mandate that commercial apples are washed to rid them of dust and any chemical residues. This also removes most of the natural waxy coating, so processors replace it with a harmless shiny shellac or carnauba spray which prevents moisture loss, enhances “firmness retention” and slows down the apple respiration rate. I know this doesn’t sound like a good thing, but it keeps apples fresher for longer; the more an apple breathes, the quicker it ages, and deteriorates in quality.

When cooking with apples, it’s important to take a moment and make sure you choose the right variety. The ones that are best eaten out of hand, aren’t always also the best ones to bake with. I love this visual guide from Epicurious which features an extensive list of all the apples you’re likely to come across not just in grocery stores but also in farmers’ markets and specifies flavor characteristics and best uses.

Once you’ve picked your variety, make sure you select the cream of the crop, so to speak. Avoid anything with soft mushy spots, blemishes or bruises. Crisp, firm and shiny are you want. Once you get them home, keep the apples in the fridge until you’re ready to use them – and no matter what else you do, don’t store them together with bananas, the ethylene the bananas release will make the apples soften.

When prepping, the best way to stop your sliced apples from turning brown is to steep them in a solution that’s 3 parts cold water to 1 part lemon juice. Incidentally, there’s nothing “wrong” with this color change, all that’s happening is that when an apple is sliced, the cells on the cut surfaces have been damaged and the iron within the cells is exposed. Oxygen reacts with this iron to form iron oxide, which is essentially rust, hence the browning. There’s also an enzyme present in apples called polyphenol oxidase that speeds up the oxidation process. Keeping sliced apples in water makes it more difficult for oxygen in the air to reach those vulnerable cut surfaces, and if you add lemon juice, the acid deactivates the  polyphenol oxidase enzyme.

French Apple Tart
Serves 8 to 10

For the crust
1- 3/4 cups, plus 1 Tablespoons  all-purpose flour
1 stick unsalted butter, straight from the fridge, cubed
1 large egg yolk, lightly beaten

For the almond filling
1-1/4 sticks unsalted butter, softened
3/4 cup caster sugar
2 large eggs, beaten
1 Tablespoons Calvados (optional)
3 Tablespoons all-purpose flour
1-1/2 cups almond flour

For the apple topping
3 Granny Smith apples, halved, cored and thinly sliced, stored in acidulated water  (water with a squeeze of lemon juice) to prevent discoloration
1tbsp granulated Demerara sugar
3tbsp apricot jam or preserves, warmed and strained through a sieve to remove bits

You’ll need a 9-inch tart pan with a removable base.

Pre-heat the oven to 360º Fahrenheit.

Make the crust: combine the flour and salt in a large bowl. Add the cold butter and use your fingertips to rub the butter into the flour until the mixture resembles breadcrumbs. Combine the egg yolk with 1 tbsp of cold water in a small bowl then pour over the flour and butter mixture. Incorporate the liquid into the dry mixture with a knife. Add more water if necessary to form a soft but not sticky dough. Form into a disc and wrap it in plastic film. Chill for 20 mins.

Make the almond filling: beat the butter and sugar together in a medium bowl until light and fluffy. Gradually add the beaten egg, little by little, stirring well to incorporate between each addition. Add the Calvados, if using, then fold in the all-purpose flour and the almond flour. set aside.

Remove the crust dough from the fridge. Roll out the dough on a lightly floured surface to a circle about 1-1/2 inches wider than the tart pan on all sides. Line the tart pan with the dough, cut off the excess and neaten up the edges with your fingers, ensuring that the dough stands slightly higher than the edge of the tin.

Spread the almond mixture evenly in the pastry case and chill for 10 to 15 minutes. Remove from the fridge and arrange the apple slices in an overlapping concentric pattern over the almond mixture. Start at the outside edge and work towards the centre. Sprinkle the Demerara sugar evenly over the top of the apples. Bake the tart for about 45 minutes or until the almond mixture is puffed up, golden and just set in the centre and the apples are lightly caramelized. Leave to cool for 10 minutes before removing from the pan.

Brush the top of the tart with the sieved apricot jam. Serve warm or at room temperature.


By Nadia Arumugam |

Tomatillos, Not just for Salsas: Chile Verde

Chile Verde

I’m very excited to have finally found some end of season tomatillos. I’ve never cooked with them before, but have spent many a moment entranced by these exotic creatures with their wispy, paper-like husks. In the past when I’ve been lucky enough to spot them, I just stare and stare at the farmers’ market then, overwhelmed by the novelty, I scurry off and pick up something far more prosaic and familiar, like an eggplant. But not this week. This week, I put six plump specimens in my basket and toddled off brimming with ideas on what to do with them.

When tomatillo season comes round, food sites and magazines always seem to offer recipes for one staple, salsa. Sometimes the tomatillos are roasted to concentrate their fresh tomato-esque flavors and mellow their acidic bite, at other times they’re used fresh to maximize their characteristic tang. I do like a good salsa, but I wanted to try something a little different with my tomatillos. Still, not wanting to stray far from traditional applications, I delved into Diana Kennedy’s The Art of Mexican Cooking for inspiration. Kennedy offers a cooked “green” table sauce made from tomatillos simmered with garlic, cilantro and serrano chiles that serves as a multi-purpose piquant base or accompaniment for many central Mexican dishes. Mmmm, now this was on the right track, but it didn’t quite hit the spot. I then recalled a hearty, spicy pork dish I’d often seen at authentic taquerias, but actually never tried, chile verde, and wondered whether the tomatillo played a role there. Lucky hunch.

Played a role? Just a few seconds on Google and I discovered the tomatillo is the star of the dish. The recipe below is an amalgamation of several “authentic” versions I came upon. The one that it most closely resembles is by “Elise,” on Simply Recipes. And for the record, that’s Elise’s Chile Verde in the photo up top. I suggest using canned green chiles rather than roasting and peeling fresh chiles (which you can do if you like). The flavor might a suffer a touch, but you’ll save a lot of time.

When buying, look for fruit that’s firm, dry and snug inside their husks. Be sure to avoid any that are moldy or soft or oozing any sticky fluids. Tomatillos will ripen to yellow, but it’s best to use to cook with them when they are still green. When you come to prepare them, peel off the husks by hand, then gently swish the fruit around in cold water to remove the viscous coating. Store tomatillos in the fridge in a paper bag, for up to 1 month.

Chile Verde
3/4 pound tomatillos
1/2 cup packed cilantro leaves with some stem
3 cloves garlic, peeled and roughly chopped
1/3 cup canned green chiles (or if you like, use the same amount of roasted, peeled and seeded mixed green chiles)
1 1/2 cups chicken broth
2 pounds pork butt, trimmed of fat and cubed into 1-inch pieces
Salt and freshly ground pepper
2 tablespoon olive oil
1 medium onion, chopped
1 small yellow bell pepper, seeded and chopped into small dice
2 teaspoons ground cumin
1/2 teaspoon dried oregano

Chopped fresh cilantro leaves, to garnish

Preheat the broiler to low. Remove the papery husks from the tomatillos and wash off the sticky coating. Slice 2/3 of them in half horizontally, setting aside the remainder. Arrange the sliced tomatillos, cut side down, on a lightly greased cookie sheet. Broil the cut tomatillos for about 10 minutes or until the skins are blistered and slightly blackened. Remove from the oven and leave to cool.

Place the broiled tomatillos, skins, seeds and all in a blender. Chop up the remaining tomatillos and add them to the blender together with the cilantro, garlic, chiles and 1/2 cup chicken broth. Blend until smooth. Set aside.

Season the pork generously with salt and pepper. Heat the oil in a large, heavy-based Dutch oven over medium-high heat. When hot add half the pork in two batches. Sear the meat until well browned all over. Transfer to a bowl using a slotted spoon, and repeat with the remaining pork. Set aside the pork. Pour off all but 1 tablespoon of oil from the pot. Add the chopped onion and bell pepper and cook until tender and golden, stirring occasionally, about 6 to 8 minutes. Add the cumin and cook and cook for a further 1 minute, stirring. Return the pork to the pot together with the blended tomatillo mixture (saving 1/4 cup), the remaining chicken broth, oregano, 1/2 tsp salt and plenty of black pepper. Cover and simmer until the pork is tender, about 2 hours.

Stir in the remaining blended tomatillo mixture, then taste and add more salt if necessary. Serve with warm tortillas or rice, garnished with chopped fresh cilantro. This stew can be made up to 2 days ahead. Cool after cooking, then cover and refrigerate. Heat thoroughly before serving.
By Nadia Arumugam |

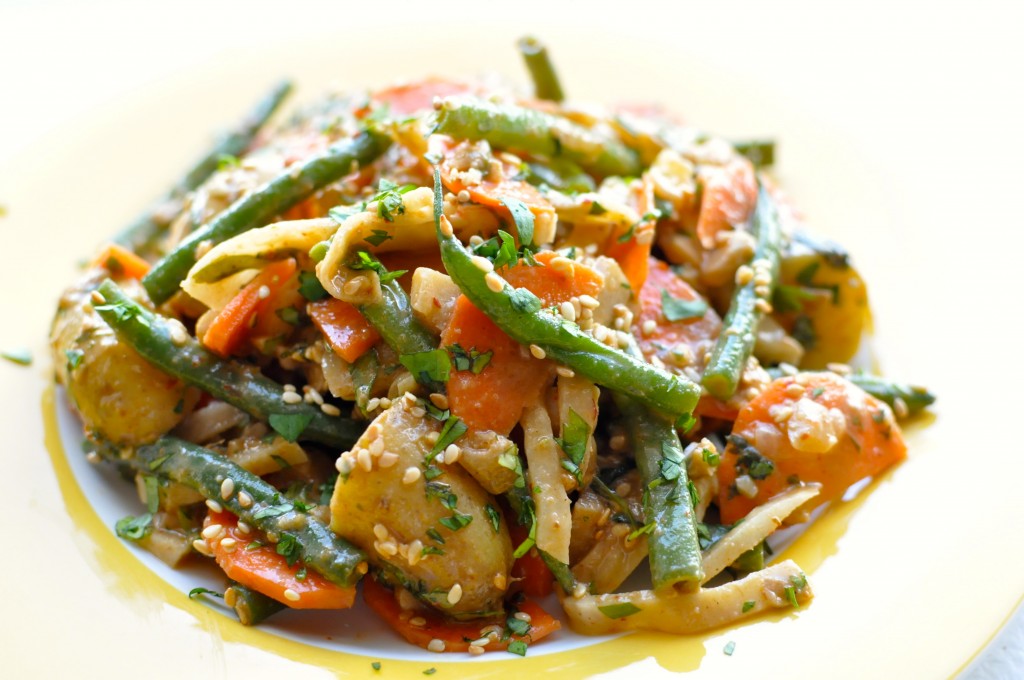
Crunchy Green Bean and Vegetable Salad with Spicy Peanut Dressing

I was inspired by Charity’s gorgeous homegrown bean harvest to make something scrumptious from these delightful runners. Beans are utterly ruined, in my book at least, by overcooking. If you don’t pay attention, they go from crisp, verdant and bright tasting to mushy, muddy and a dreadful khaki-green in a matter of minutes. Needless to say, green bean casserole wasn’t an option.

I love that squeaking sound that a perfectly crunchy, just-tender bean makes when you chew on it. So with “squeaks” a priority, an Indonesian vegetable salad, Gado Gado immediately came to mind. The dish, often sold by road-side hawkers and assembled to order in minutes, traditionally comprises chunks of boiled potato, green beans, and bean sprouts, cucumber slivers, cubes of fried tofu and wedges of hard boiled eggs all tossed in a decadent sweet-savory curried peanut dressing. With just a few tweaks and embellishments of my own, this was easy enough to re-create, or rather approximate on a Tuesday night with some help from the more exotic ingredients in my pantry.

With my head deep in the recesses of the vegetable drawer at the bottom of the fridge I began by assembling my base. I settled on green beans from the farmers’ market which I trimmed, briefly blanched and refreshed under cold running before cutting into thirds, thinly sliced carrot crescents, jicama matchsticks and boiled and halved fingerling potatoes. How much, you ask? Hmmm…enough for two, and leftovers for lunch.

Then I set about preparing the sauce. First, I sautéed 1/2 a chopped onion in some vegetable oil in wok, then spooned in a dollop of Thai red curry paste. The paste sizzled and fizzed in the oil and mingled with the onion as I stirred vigorously over a high heat. After a minute or so I added a generous tablespoon of smooth peanut butter and a teaspoon of dark brown sugar to the fragrant melange in the wok, followed by 1/2 cup of coconut milk. I whisked until there were no more lumps, then brought the sauce up to the boil and simmered it gently until it thickly coated the back of a spoon. I threw in 1/3 cup of crushed lightly salted peanuts, cooked the mixture for a minute, then stirred in a handful of chopped fresh cilantro. Finally, I tasted and seasoned the dressing as needed, and removed the wok from the heat. Once it had cooled for a few minutes, I poured the dressing over the vegetables and gave the salad an energetic toss. For good measure I sprinkled 1/4 cup of lightly toasted sesame seeds and more chopped cilantro over the top. A final toss, and done!

By itself this dish makes a perfectly filling lunch dish, or light dinner. For extra heft on a cool fall evening, accompany with seared steak or broiled chicken breast, thinly sliced.